Software: Samba, Deja-Dup, Git, GitHub, and systemd service.
3. Regular Backups
b. Deja-Dup Incremental Backups to NAS
Assuming you have an old NAS like I do, let’s mount it on the Raspberry Pi server and use it as a backup medium.If you don’t have a NAS, you can simply connect an external hard drive and skip the NAS mounting steps. Continuing from the previous post, we’ve already logged into the Raspberry Pi using ``$ ssh -Y
.
$ cd /media; sudo mkdir NAS
$ cd ~; vi mountNAS.sh
The first line enters the/mediadirectory and creates a folder namedNAS. The third line returns to the home directory and creates a Bash script containing the command to mount the NAS folder, so you don’t have to memorize the cumbersome parameter syntax.Next, add the following two lines to
#!/bin/bash
sudo mount -t cifs //<the NAS' ip>/<share folder name> /media/NAS -o vers=1.0 -o user=<username on NAS> -o password=<pwd on NAS>;
: The first line specifies that the script should be executed using bash, and the second line contains the command to mount the CIFS 1.0 drive. If your NAS isn’t that old, you can probably skip ``-o vers=1.0
. Save the file at
$ sudo chmod +x mountNAS.sh
$ ./mountNAS.sh
and make the script executable. Then, run the script to mount ``<share folder name>
from the NAS to ``/media/NAS
. You can use ``$ ls /media/NAS
` to verify that the mount was successful (check if files from the NAS appear in the empty folder).
We will use Deja-Dup for backups, and since only one Deja-Dup task can run on a Linux system at a time, I’ve changed the target directory to the entire home directory instead of just the Hugo website directory.Additionally, Deja-Dup has a feature where it only starts overwriting old backups once disk space is exhausted. However, the software itself cannot set a disk usage limit on its own, so we need to create a fixed-size file on the NAS, convert the entire drive to ext4, and then mount this partition to the Raspberry Pi.
$ cd /media/NAS/; sudo mkdir Backup
$ cd Backup; touch Area200GB
$ truncate -s 200G Area200GB
$ mke2fs -t ext4 -F Area200GB
The first line creates a folder named Backup on the NAS to store backups; the second line enters the Backup folder and creates an empty file named Area200GB; the third line limits the maximum disk space for this file to 200GB; the fourth line formats the internal file system of this empty file to ext4.This allows us to mount this virtual hard drive and use its limited capacity for backups with Deja-Dup.
$ cd ../..; sudo mkdir DejaDup200GB
$ sudo chown <new user name> DejaDup200GB
$ cd ~; vi mountNAS.sh
The first line returns to ``/media`
and creates a backup folder dedicated to Deja-Dup (we will mount the 200GB dummy hard drive to this folder). The second line changes the owner ofDejaDup200GB to the new account we created earlier. The third line returns to the home directory and edits the ``mountNAS.sh
script. Add the following two lines to the end of the file.
sleep 2
sudo mount /media/NAS/Backup/Area200GB /media/DejaDup200GB
The first line instructs the system to wait two seconds for the NAS drive to finish mounting. The second line mounts the fake ext4 drive to ``/media/DejaDupBkp
. Save the file and run this script once more.
$ ./mountNAS.sh
Now we can use ``$ ls /media/DejaDupBkp
to check if an empty folder named ``lost+found
has appeared—this was created bymke2fs`. If it exists, it means all steps so far have been executed correctly.
I almost forgot the main point of this site: to make the system maintenance-free in the future, we must create a systemd service to automatically mount the NAS and this 200GB dummy hard drive after every boot.
$ sudo /etc/systemd/system/mount_nas.service
Paste the following lines into this service file after modifying the necessary paths:
[Unit]
Description=Mount NAS service

[Service]
Type=forking
ExecStart=/home/<new username>/mountNAS.sh

[Install]
WantedBy=default.target
The service type used here is forking, which ensures the service continues running even if the parent process stops. Next, let’s run this service once.
$ sudo umount /media/DejaDup200GB
$ sudo umount /media/NAS
$ sudo systemctl start mount_nas
$ sudo systemctl enable mount_nas
The first two lines unmount the two hard drives, the third line runs the service once, and the fourth line allows the Raspberry Pi to run this service at every boot. We can use $ ls /media/DejaDup200GB to verify if any files or folders appear in this directory. If both hard drives mount successfully after rebooting the Raspberry Pi, then the service is functioning properly.
Next, we’ll use Deja-Dup to set up a backup.
$ deja-dup&
Your Pi OS may not come pre-installed with Deja-Dup, so first install it using the command ``$ sudo apt install deja-dup`
, then run it. Add the ``&
` symbol at the end of the command to run it in the background, allowing us to continue using the command line. After a few seconds, the computer you’re currently using should display the Deja-Dup X11 graphical interface on this computer.
|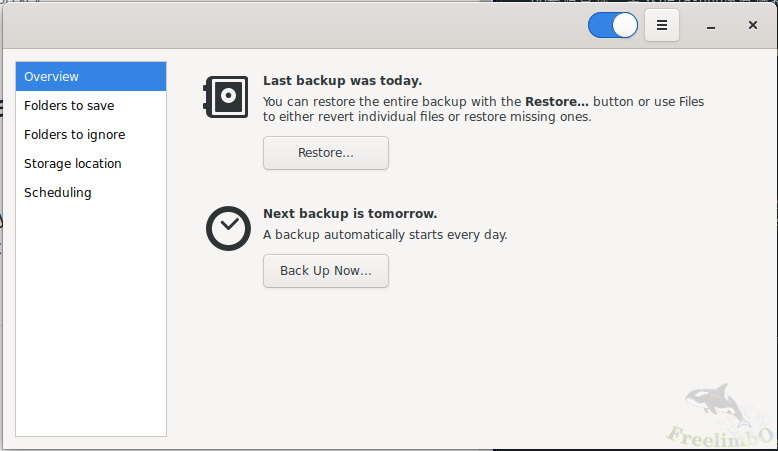
|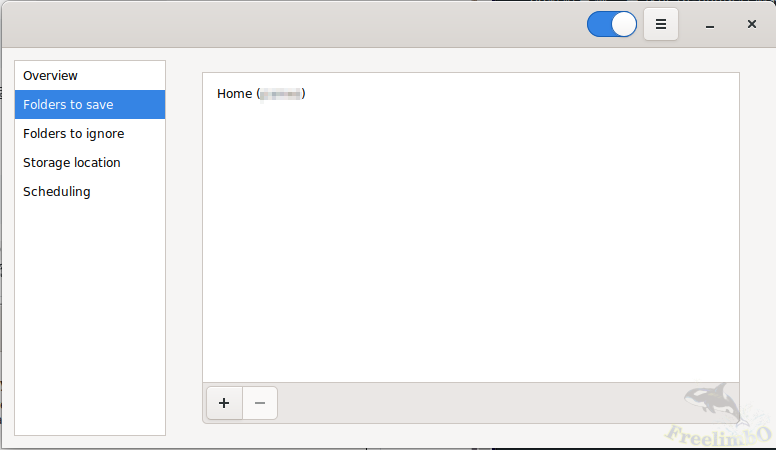
| deja-dup overview | deja-dup folder to save |
 |
|
|
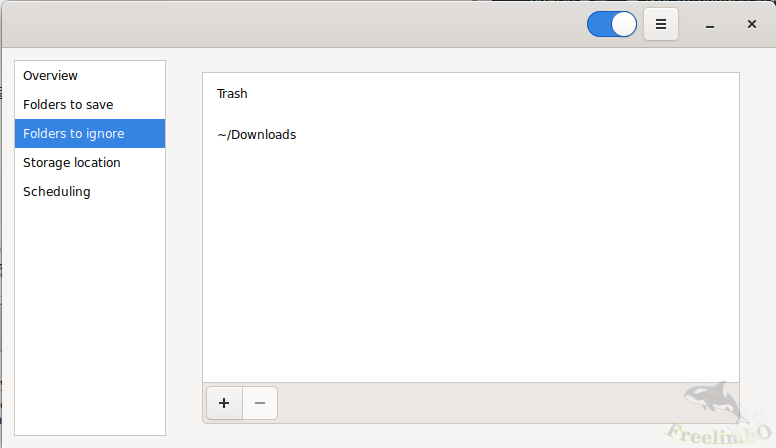
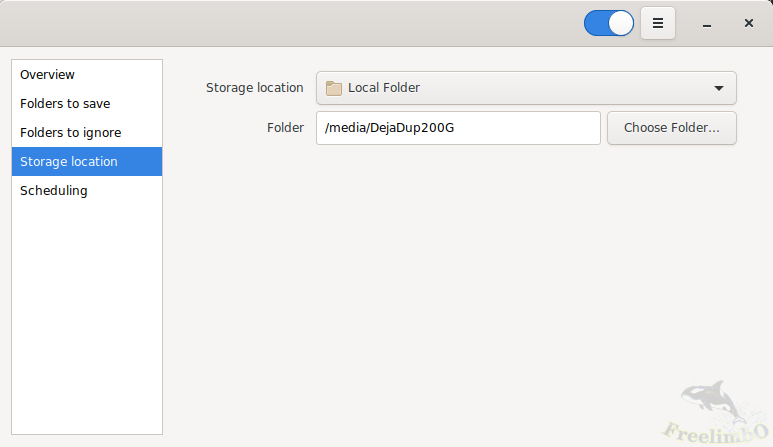
|deja-dup folders to ignore|deja-dup storage location|
|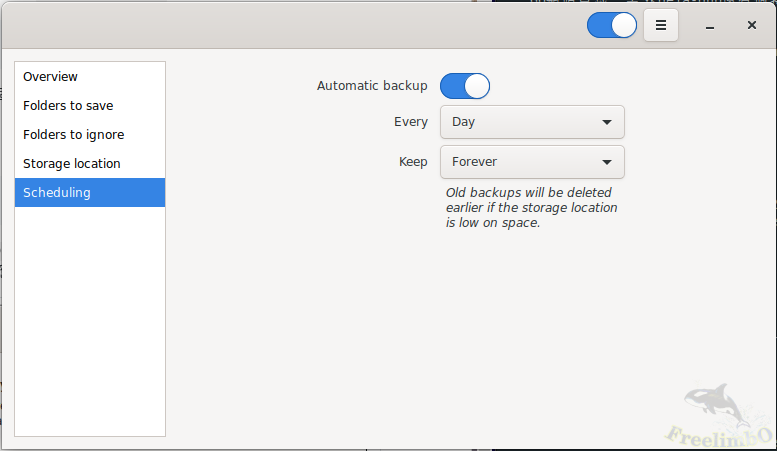
| |deja-dup scheduling|
Deja-dup has five tabs. Start configuring from the second tab and work through to the last one, then return to the first tab and click “Back Up Now…” It will ask if you want to require a password for future restores—this is up to personal preference. As for the restore process, click “Restore…” to select a restore point; the process is quite intuitive. With that, we’ve completed our second clone.
c. GitHub Version Control and Backup
For the third clone, we’ll use [GitHub](https://github.com/
), which also serves as a version control tool.First, you’ll need to register a GitHub account. Basically, just fill in the required information; you’ll need an email address to register, which will be used to log in to GitHub. Once email verification is complete, to save time in the future, we need to generate an SSH key on the Raspberry Pi associated with this email address (a long string of alphanumeric characters generated by a specific algorithm).```
$ ssh-keygen -t ed25519 -C<email address>


$ sudo apt install xclip
$ xclip -selection clipboard< ~/.ssh/id_ed25519.pub
第一行指定ed25519演算法產生金鑰到預設資料夾,系統應該會問一些問題,但是都使用預設選項不用打字直接按enter略過即可。第二行安裝了命令行剪貼工具,第三行剪下金鑰傳回本機電腦的剪貼簿。接著我們回到瀏覽器登入GitHub,從右上角點擊自己的帳號圖示,選擇"Settings",左邊選擇SSH and GPG Keys,把xclip複製來的文字串右鍵貼入文字框中,點擊下方"Add SSH Key"。
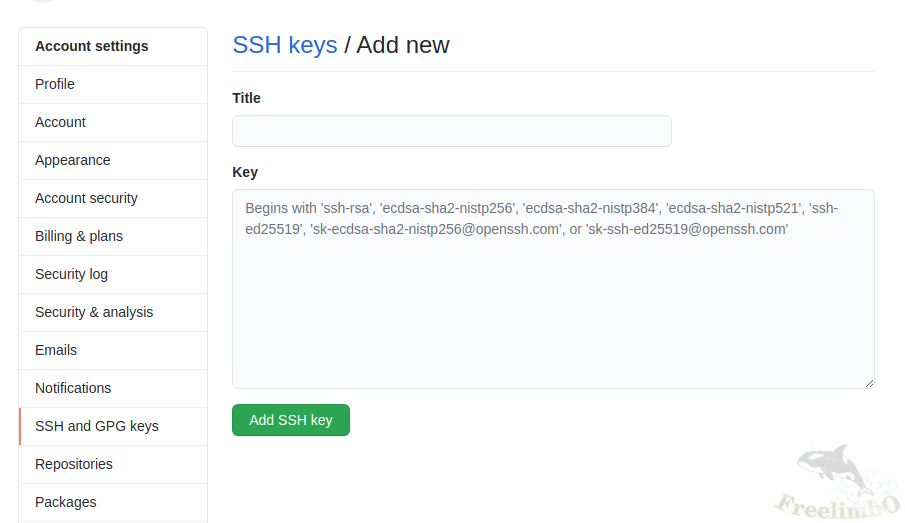 |
|---|
| Add SSH Key to GitHub |
接著點擊左上角自己的帳號名,然後點擊上方"Repositoies",再點擊右邊的綠色"New"按鈕創建一個新的GitHub案子,這裡需要填寫Repository name,我把我的部落格名稱填進去(也就是上一篇的<your site name>),選擇Private,然後就可以點擊綠色按鈕"Create repository"。
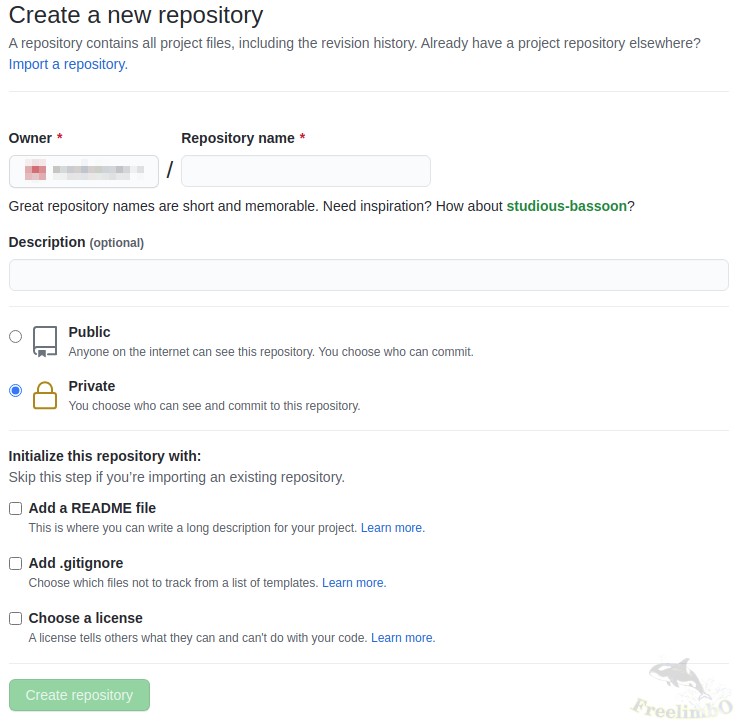 |
|---|
| GitHub create repository |
回到命令行,我們現在可以初始化網站目錄成為一個git版本控制資料夾。
$ cd<HUGO project>

/<your site name>


$ git config --global user.email<email address>

$ git init
$ git add .
$ git branch -m main
$ git commit -m "First commit."
第一行進入網站資料夾,第二行設定git在樹莓派上的email帳號,第三行初始化網站目錄成為git控制的資料夾,第四行加入資料夾中所有檔案與資料夾受到git追蹤,第五行為當前的branch改名為main (git預設主要branch名為master,但是GitHub預設主branch名為main),然後第六行進行第一次commit(存檔進去git紀錄的歷史中)。
接著我們回到瀏覽器,進到剛創建的repository裡,點擊中間偏右的綠色按鈕Code,再選擇SSH,複製框框中git@開頭git結尾的一串網址。
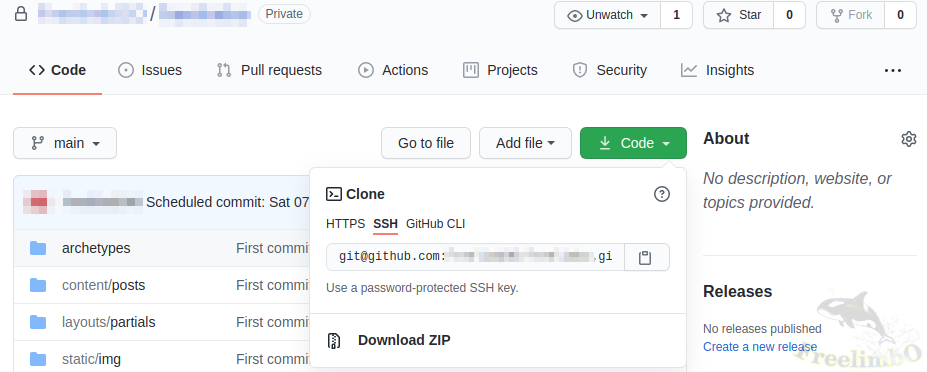 |
|---|
| Copy SSH git |
再次回到命令行,輸入
$ git remote add origin<SSH git address>

$ git push -u origin main
$ vi commitToGitHub.sh
其中<SSH git address>就是剛剛從網頁上複製的那串網址。第二行進行第一次push,把網站資料夾推送到GitHub並且設定了往後都推送往同一個main branch。然後我們再寫一個script為自動化備份做準備,把以下六行填入script。
#!/bin/bash
date_time=$(date)
echo $date_time
git add .;
git commit -am "Scheduled commit: $date_time";
git push
第一行BJ4,第二行取得樹莓派系統時間,第三行列印出系統時間,第四行添加所有資料夾中的檔案受git追蹤,第五行commit並且以系同時間作為註釋,第七行push (備份上GitHub)。儲存後離開編輯器。
$ sudo chmod +x commitToGitHub.sh
$ ./commitToGitHub.sh
第一行允許執行這個script,第二行執行這個備份到GitHub的script,理論上不會有錯誤訊息,我們採用SSH金鑰連線上傳到GitHub也是為了避免輸入帳號密碼。現在可以使用$ git status確認是否已經與GitHub端的資料同步,如果出現"Your branch is up to date with ‘origin/main’",就表示成功了。
再來我們使用Linux的systemd來自動化每天的GitHub備份。
$ sudo vi /etc/systemd/system/commit_to_github.service
把以下幾行貼入編輯器
[Unit]
Description=Commit site folder to GitHub service
Wants=commit_to_github.timer

[Service]
Type=oneshot
User=<new username>

WorkingDirectory=/home/<new username>

/<HUGO project>

/<the site name>

ExecStart=/home/<new username>

/<HUGO project>

/<the site name>

/commitToGitHub.sh

[Install]
WantedBy=default.target
光有service還不夠,需要另外建立一個timer
$ sudo vi /etc/systemd/system/commit_to_github.timer
再把以下幾行貼入
[Unit]
Description=Back up site folder to GitHub every day
Requires=commit_to_github.service

[Timer]
Unit=commit_to_github.service
OnCalendar=*-*-* 00:00:00

[Install]
WantedBy=timers.target
注意這兩個檔案的檔名必須被包含在對方的設定裡,如此timer才能在OnCalendar指定的時間執行service。接著輸入
$ sudo systemctl daemon-reload
$ sudo systemctl start commit2github.service
$ sudo systemctl enable commit2github.service
The first line reloads systemd, the second line runs the service once—theoretically, this should complete the backup successfully—and the third line ensures the service remains active after boot.We can use ``$ sudo systemctl status commit_to_github.service`
to check the output of the first execution, and ``$ sudo systemctl status commit_to_github.timer
` to verify if the status is currently “waiting.” If the service status check the next day shows “Success” and new commit records are visible on the GitHub page, then the GitHub periodic backup configuration is successful. The 3-2-1 backup rule is achieved!
In the next issue, we will continue by using No-IP to expose the website to the public internet, and then use Commento to add a comment section to each blog post.